
Vintage Christmas Ornaments
Punch a Pretty Pillow for the Holidays
When most people think of Christmas, the colors of red and green come to mind. Pink, purple, blue, and orange are not colors typically associated with the holiday. However, there are always trends that sweep through the world of Christmas decorations. The first American mass-produced ornaments embraced color in every way.
Prior to WWII, glass ornaments and ornament-making supplies were imported from Germany. An enterprising American with German roots, Max Eckardt, saw that supply would be interrupted by the fast-approaching war. He contacted Corning, a glass manufacturer, with his idea for glass ornaments. Corning modified their light bulb– making machine to produce ornaments, and in 1939 the first mass-produced machine-lacquered ornaments hit the shelves at Woolworth. At its height, Corning produced 300,000 ornaments a day under the name Shiny Brite. Postwar Americans filled their trees with these brightly colored ornaments. The trend ended with the advent of plastic ornaments in the 1960s. Shiny Brite sadly closed its doors in 1962.
A few years ago, while helping my mother-in-law clean out her garage, I discovered a box of gorgeous Shiny Brite ornaments. My Christmas aesthetic has always trended to the traditional red, green, and gold of my own childhood; however, I couldn’t place the box in the giveaway pile. I kept looking at them. I took out my phone and snapped photos. I touched them, and imagined my husband and his sister sitting under a tree with the uncommonly colored ornaments sparkling above them. Every part of me wanted to take them home.
But I am a practical person, and I worried they would not survive the plane ride. If they did survive, would they survive life in our household where delicate ornaments rarely made an appearance? After much deliberation, I decided that these unique ornaments should find their way to collectors. I sadly placed them in the pile of items that would not go to our home or my mother-in-law’s new home, and wished them well.
From my memory of those boldly colored ornaments, this pillow design was born. I was able to remember and honor my husband’s childhood and stretch my color wings at the same time. It was an absolute delight to design and punch.
This design can be punched by a beginner punch needle rug hooker, and it can also be a wonderful learning tool for those who know how to use a punch needle but would like to refine some of their techniques. The main technique stressed in this design is the single punched line—how to do it, and how to make it stand out.
Here Are Some General Punch Needle Tips and Tricks.
-
Hold the punch needle like a pen, with the channel running in between the index finger and thumb. When punching, the angle of the punch is more vertical than a traditional pen or pencil.
-
Punch all the way down into the monk’s cloth. Don’t be shy. The punch is designed to stop when it hits the fabric. Not punching all the way down will result in tiny loops. Tiny loops will also appear if the yarn becomes trapped under your frame or elbow.
-
The main fine-motor action of punching is when coming up out of the fabric. Punch all the way down, then slowly draw the needle up and just out of the fabric. Imagine shuffling along the floor in Christmas slippers or ice skating on a winter pond. The needle skims the top of the monk’s cloth and then goes back down for the next stitch.
Spacing Stitches Is the Key to Success
- Six stitches per inch for any SINGLE line in the design and for any border rows
- Four stitches per inch for filling in the background
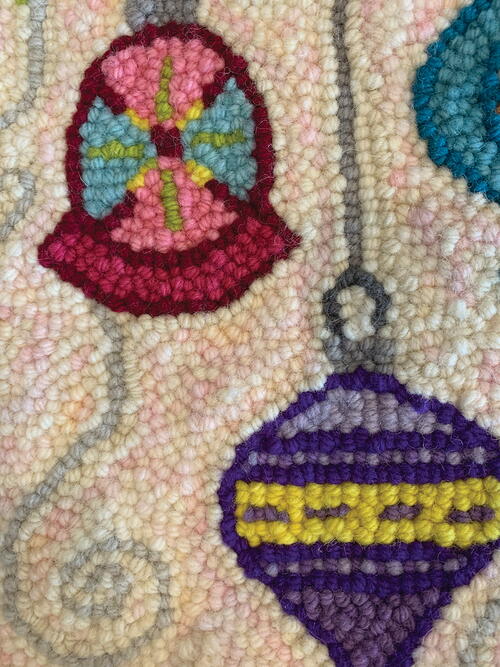
There are many single lines in this design. The borders of the ornaments, the strings they hang from, the needles of the pine tree—all are single lines. These must be punched six per inch. If they are stretched out, they will appear like polka dots and not give the appearance of a solid line.
The messy phase of punch needle rug hooking is perhaps the hardest for new punchers to work through, especially if one has a background in traditional rug hooking. In traditional rug hooking, the loops are pretty much where they are wanted when they are pulled. A nice steaming at the end and maybe a nudge here or there and a traditional piece shapes up. Not so with punch needle rug hooking—it is necessary to clean up. When working on a punch needle design, do not get discouraged by how messy the looped side looks. It is part of the process. Considerable speed is gained when using a punch needle versus a hook; the tradeoff is the final clean up and the aesthetic struggle of the messy phase.
As the design is punched and yarn colors are started and stopped, push all the cut yarn tails through to the looped side of the design. The back of the work looks crisp and clean, and the looped side is covered with tails. Now is the time to clean it up. Take the back of closed scissors and rake them across the work. Many tails are trapped in the loops; they will pop up when the scissors handles pass over them. Gently tug on each tail and snip it flush to the work. The snipped tail will disappear into the work.
Once all the tails are trimmed, get all those single lines cleaned up. With a closed pair of scissors, poke and prod those loops with the pointed end, until they are where you want them. This makes an incredible difference in the finished piece. Do not rush this process. Some of the single lines may appear faint even after the cleanup. With those lines, it often helps to pull them out and re-punch them. The last loops punched are always the most visible. This is a handy trick to know.
Steaming the work is very important. Yarn is dense, and steaming fluffs up multi-ply rug yarn with gorgeous results. Lay the piece, loop side up, on an ironing board. Cover it with a very damp towel. Steam with a hot iron and a reasonable amount of pressure, ten seconds at a time. This relaxes the yarn and fluffs it. Prior to this step your piece will have a curl to it. That is a good sign: If the finished work curls like a taco, wonderful. There is the correct amount of yarn in it, and it will steam flat. If it is rolled like a taquito, it is punched too tightly, and a hearty steam may not relax it. If the work is limp, like a tortilla, then more yarn could have been used.
Are there visible areas of the monk’s cloth on the working side of the piece? If so, fill these in for a fuller and more finished look. It is a balance, and you will find that this is where the six-per-inch and four-per-inch really come into play.
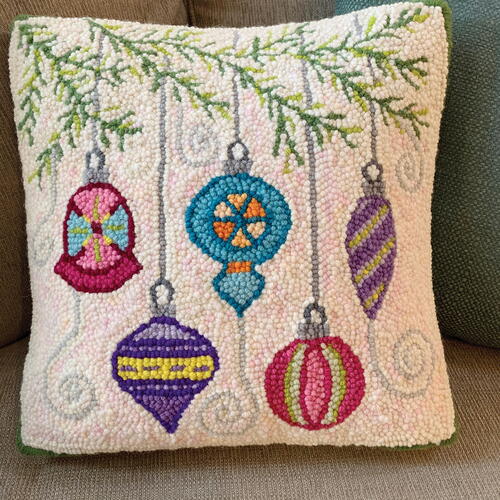
After the work is steamed, it is time to finish the edges. There are so many ways to finish a punch needle piece. You can finish it as you would a traditional hooked piece. A nice turned hem, sewn down on the back side is a popular option. My favorite is the whipped edge. With a whipped edge the piece can later become a pillow with the addition of a hand-sewn backing, or it can stay as-is for a wall hanging.
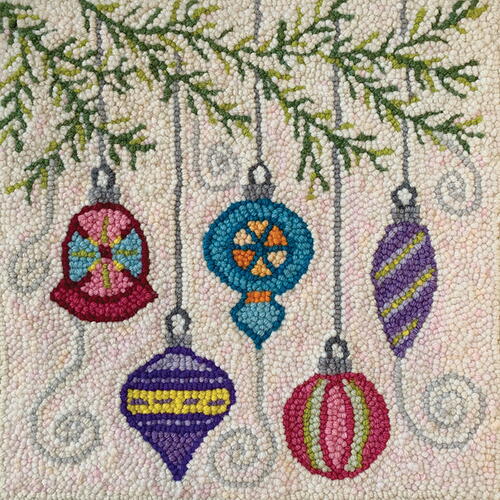
The design can be blown up and an additional border can be added to make a small square rug. The example shown is a 16" x 16" pillow. RHM
Additional Images
-
Vintage Christmas Ornaments, 16" x 16", hand-dyed rug yarn by StoryTeller Wool on monk’s cloth. Designed and punched by Rebecca Martin, Longmont, Colorado, 2020.
-
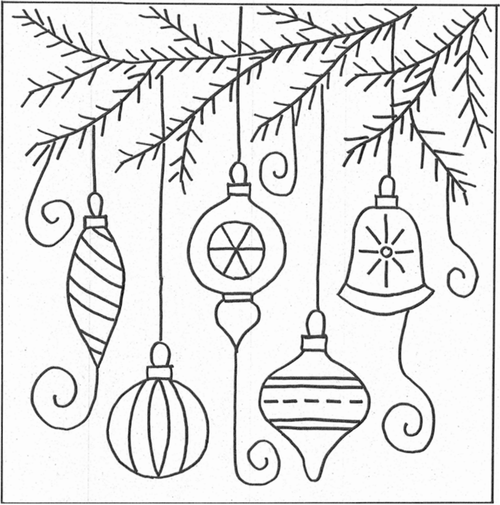
Vintage Christmas Ornaments, © StoryTeller Wool, 2020. For a mat or pillow approximately 16" x 16", enlarge the pattern by 240%.
Rebecca Martin is a passionate rug hooker, enjoying both punch needle rug hooking and traditional rug hooking. Originally a native of the East Coast, she makes her home in Colorado with her husband and two children. Rebecca teaches rug hooking and runs the c ompany StoryTeller Wool LLC that she started with her dear friend Cheri Whiton.

