Ewe Who
A Rug Hooking Exclusive Pattern

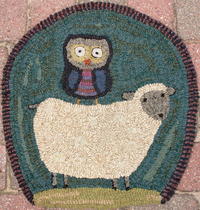
Ewe Who, 18" x 19", #9-cut wool on linen. Designed and hooked by Maria Barton, Star Rug Company, Indian River, Michigan, 2011.
Sheep are one of my favorite motifs. This pattern combines a sheep with a whimsical owl in a uniquely shaped rug, called Ewe Who.
Transferring the Pattern
The pattern is full size, so there is no need to enlarge it unless you want to make the rug bigger. To trace the pattern, place red dot over the pattern and trace the lines with a black marker. Next, place the red dot onto your foundation and trace over the red dot pattern with a black magic maker, bleeding the pattern onto the foundation piece. Or use a light table to transfer the pattern. Make sure that the outside lines of the pattern are straight on the grain.
Prior to hooking, zigzag or serge around the edge of your foundation to prevent the fabric from unraveling during hooking. Leave at least 4" of foundation around the pattern so that it will fit your rug hooking frame or hoop.
Attaching the Binding
Prior to hooking the rug, I sew my binding tape onto the pattern. If you sew the tape onto the pattern before you hook, you can use a sewing machine. This method of attaching the binding saves me an hour or two depending on the size of the rug. If you wait until the rug is hooked, sew the binding by hand.
To attach the binding prior to hooking, place the binding on the outside line of the pattern. Stitch as close to the edge of the binding and the edge of the design as possible using a straight stitch. Sewing the binding around the corners can be a little tricky, but if you manipulate the binding by holding it and turning it at the corner, and by moving the sewing machine slowly, you will be able to do it. Right before the two raw edges of binding meet, fold the edge of the unattached piece of binding under and place it over the attached binding. Sew it over the binding about ½" inch. This makes a nice clean finish to the binding.
Hooking the Pattern
This rug was hooked using #9-cut wool, except for the eyes and nose of the sheep and the beak of the owl. If you have attached the binding, hook the last row of loops around the outside edge of the rug first. The hooking should abut the binding tape.
Sheep
Hook the body of the sheep with a cream/tan wool. To create a little whimsy and interest, I made standing wool circles and attached them to the foundation of the linen before hooking the body of the sheep. You can make the circles as big or small as you want or add different colors to the circles to make them “pop.” I made my circles from the same wool as the sheep.
Hook the face, ears, tail, and legs with a gray checked wool. To keep the gray wool and these sheep parts from disappearing into the background wool, outline the shape with contrasting wool. To use this technique, outline the hooked shapes with a narrow strip of contrasting wool and simply hook carefully around the shape. It might be hard (try a smaller hook) and a little tight, but that is precisely what creates the outline, or “beauty line.”
Use a #7-cut strip of wool to hook the eyes and nose. Eyes and smaller shapes are tricky to hook and definition is oftentimes lost if they are not hooked correctly. To hook the eyes, start with black wool for the pupil and hook a loop or two. Outline the eye with gray checked wool, packing the loops closely around the eye and to each other. Packing the wool helps to give definition to small motifs like eyes and the nose, but only use this technique around small motifs. Use the same technique for the owl’s beak.
Owl
Use dark blue wool to outline the face and wings. Make standing rolled circles of black wool and heathered craft felt for the eyes. Roll the black wool or felt into a small circle, cut off any excess wool, and sew. To this small circle, attach the white wool or felt by rolling the wool around the black circle, cut off any excess wool, and sew. Finally, roll one strip of black wool or felt around the circle, and sew. Attach them to the owl before hooking.
Hook light colored wool around the standing circles to complete the face.
For the chest of the owl, strips of purple wool look great. Hook the beak with orange and the feet with mustard.
Grass
To create movement in the grass, use two different colors of light green wool.
Background
Use bluish-teal wool with some texture. To add interest, use at least three different wools of the same color family. I chose teal blue. To keep the background from looking garish, make sure at least one of the wools has texture. I usually use seven or eight different wools in my backgrounds.
Border
The beaded border was achieved by hooking a double row of wool. For the best result, use wools that contrast with the background but complement the sheep and the owl. I suggest purple and dark blue for the beading in Ewe Who. Align the two colors so they are side by side with the same color: purple wool should be next to purple wool, and blue wool next to blue wool. You may need to space your loops more widely on the outside row to achieve this look.
Finishing the Rug
Serge or zigzag around the pattern about ½” from the edge of the rug and cut away any excess foundation. Before steaming the rug, remove any wool dust from the rug with a lint brush or a sweeper attachment. This is an important step as wool dust gathers on your hooked piece as you work.
Finally, steam the rug. Place a protective cloth over the pad of your ironing board, and lay the rug on it hooked side down. Put a damp cloth over the back of the rug, then place the iron on the rug and hold and steam. Move the iron to the next area and steam. Continue in this fashion over the entire surface. Turn the rug over, and press the front the same way. Press the excess foundation to the back. Lay the piece flat, and allow it to dry overnight. If you attached a binding to the rug before hooking, blind stitch the binding to the back of the rug now. If not, attach the binding to the rug using your technique of choice.
Maria Barton began rug hooking in 1992 and operates Star Rug Company, a web-based business devoted to primitive hooked rug patterns. She has been recognized by Early American Life as one of the top artists in the country in 2005, 2006, and 2011. In 2011, she was a judge for Celebration. Her work has been featured in Early American Life, Wool Street Journal, and Phyllis Hoffman’s Celebrate. Visit her site at www.starrugcompany.com.
This article is from the January/February 2012 issue. To get this exclusive pattern or for more information on our issue, check out our issues page.
Materials List
- 30” x 28” piece of primitive linen, monk’s cloth or rug warp
- Black permanent marker
- 2 yd. black binding tape
- Needle and thread
- Sheep body: cream/tan checked wool - 1/4 yd.
- Sheep face, ears, tail, and feet: gray checked wool - 1/8 yd.
- Sheep nose and mouth: dark blue wool - strips
- Owl face and wing outline: dark blue wool - 1/16 yd.
- Owl wings: deep purple wool - 1/16 yd.
- Owl face: light green wool - 1/16 yd.
- Owl eyes: black and heathered white craft felt
- Owl chest: purple wool - strips
- Owl beak and feet: orange and mustard wool - strips
- Background: mixture of bluish-teal wool - 3/4 yd.
- Grass: light green wool - 1/8 yd.
- Border: each of blue and purple wool - 1/8 yd.
Read NextHere Comes Santa