A Passion for Punch
A Calendar Hanger for the New Year: Part One of a Series

Gathering the materials for the project.
Punch needle rug hooking has recently taken the fiber world by storm. It is fun, quick, satisfying, and has endless possibilities. The ergonomics and ease also make it great for those who have trouble pulling loops or maintaining a consistent height. I wouldn’t be a responsible puncher if I didn’t add the warning that it is also highly addictive! Plus, doing the things we love helps to chase away the winter doldrums, so these sweet calendar hangers are a great way to practice and display our punch hooking.
When the holiday hustle and bustle is behind us, we in the northern hemisphere are left with many more long dark nights of winter before us. It can be a special time of contemplation, rest, and renewal. Winter also brings thoughts of crisp snow, cold toes and frozen noses, glistening icicles, and getting warm by a crackling fireside; it’s a time to snuggle up with those we love and to work on our wonderful woolly hooking. A pattern featuring warm mittens and loving hearts is the perfect project.
Punching your Design
Trace the design on the monk’s cloth, the backing of choice for many punchers. If you don’t have a light box, windows make a great substitute, and monk’s cloth is easy to see through. You only need to draw the top part of the design as the lower dotted rectangle shown on the paper pattern demonstrates the shape of the wool fabric you will cover the back with when you finish the punching.
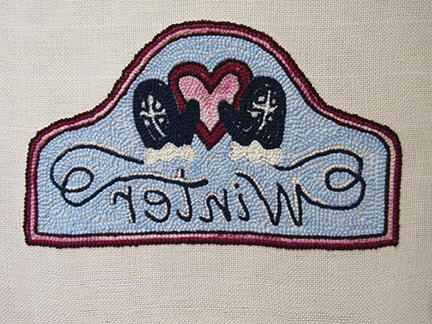
You’ll notice that the words are backward—this is not a mistake! Punch needles push loops instead of pulling them, so the pattern side is actually the back of the rug. Punch designs are therefore created in mirror image so that you can read the lettering properly from the finished side.
When you have the pattern drawn, put the monk’s cloth into your hoop or frame. A really tight backing makes a significant difference to how even your loops will be and the ease of punching, so keep stretching it until it is tight like a drum.
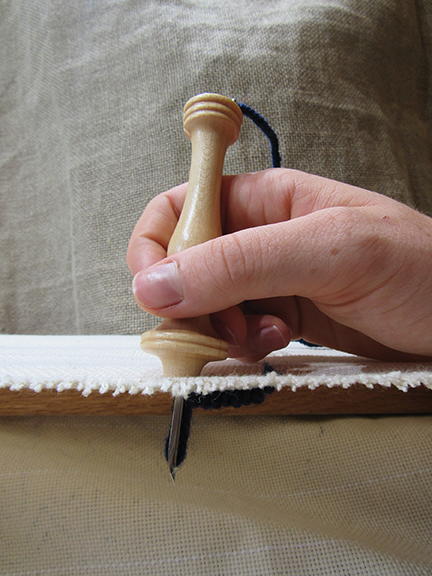
Now you are ready for the fun part—the punching! For the mittens and lettering, I used the #13 Fine Oxford punch, which makes a 3⁄16" loop. I punched the remainder of the design with the #14 Fine, which makes a 1⁄8" loop. This makes the mittens and lettering stand out just a little bit above the rest, adding extra interest and definition. However, it is fine to punch the entire design with the same fine punch needle.
I work on my central motif first. Start by punching tiny details, then punch around them. This ensures that you don’t accidentally fill in the space the small details need. Keeping this in mind, punch the snowflake decoration on the mitten first, then the cuff, using the white yarn and the #13 Fine punch. Change the color to navy blue and fill in the rest of the mitten.
The size of the stitches you make will vary depending on the weight of the yarn you are using and how well it fills out. For the worsted weight wool yarn that I used, I punched about 10 stitches per inch, and alternated punching in the next row over and then leaving a space between rows to make sure that the loops didn’t become too packed. It’s okay if a little backing shows between your rows on the back as long as you don’t see the spacing on the front. Push your tails through to join the loops on the front side (the side that will be the finished side) as you work.
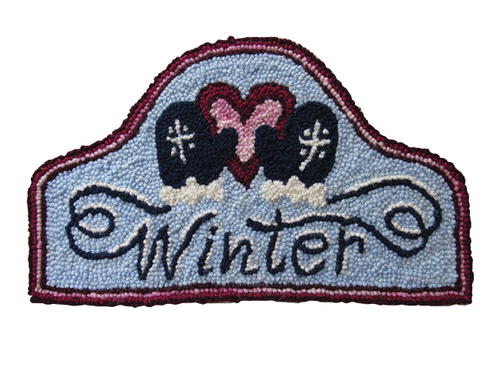
Now it’s time to punch the mitten strings that create the word WINTER. Use the navy blue yarn and punch the mitten string, making nice short, even stitches. If your stitches get too far apart, your single line will start to appear broken on the finished side, so keep those stitches fairly close. As you create the letters, make crisp turns with the punch needle in the down position to help keep your loops an even height. When the letters are finished, add highlights using the white. Refer to the photo for placing the highlights. I think they look like a pretty dusting of snow on the letters, don’t you?
You may decide to take a look at what will be the finished side. You might be horrified. Your loops might look higgledy-piggledy. You might even have trouble reading the word. There are yarn tails everywhere. Don’t worry, and don’t pull it out! This messiness is completely normal. You just need to punch the surrounding loops to make it clearer and to get to the finishing stage. Eventually, you will clip and tidy up. It will all come together in the end!
It is time to warm things up and punch the heart. Change to the #14 Fine punch needle (if you are using both sizes). Outline the heart first with dark maroon, staying just to the inside of the lines, then fill in the center of the heart with pink. I like to start at the edge and work my way inward, going around and around as I fill it in. When the pretty pink center is completed, do the final band with the light maroon. Are you starting to feel the punch needle love?
You are now in the home stretch! Before you begin the background, punch the outer border. Keep your stitches nice and close but not packed. I punch four lines of border using dark maroon, then pink, followed by the light maroon, and making the outermost line dark maroon. Finally, to finish off the punching, use your light sky blue and fill in the background, taking care not to crowd your loops around the letters.
Now it is time to take it off the frame and turn it over. Trim off all the tails by pulling up gently on them and snipping them level with the loops. Poke any stray loops back into place and straighten up any wiggly lines. Next, give it a good steam on both sides. It’s amazing what steaming can do!
Assembling the Hanger
Mark the backing one inch out from your punching, then trim off the excess. You may want to put hot glue around the cut edge so that it doesn’t come unraveled as you work. Turn this edge under so that it lays flat against the back of the rug and can’t be seen from the front. Use the iron to press it; glue it down or baste it in place if you wish.
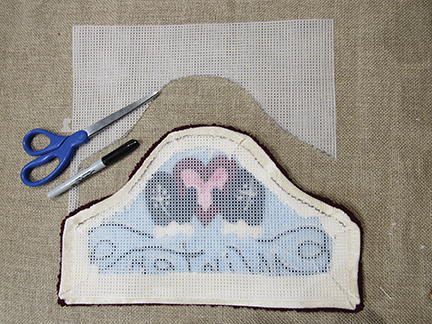
Place the plastic canvas over the back of the punched piece and trace the shape on it, staying about ½" to the inside. Cut out the plastic canvas and double check the fit. You should see a nice ½" border all the way around it. Fasten it in place with a few dabs of hot glue or a few stitches with a needle and thread.
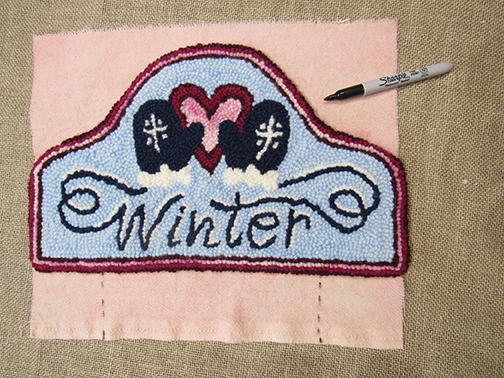
Next, lay your rug on your wool fabric, placing the punched arch at the top edge. Lightly trace the outline of it on the wool, including the dotted rectangle shape that is on the paper pattern. You now have the calendar shape and a little rectangle extending from the bottom of it drawn on your wool fabric. It should fit nicely right up to the edge of the punching.
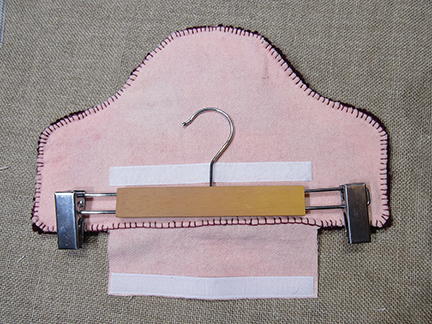
Once you are satisfied, cut it out and fasten it to the back of the rug. Add a few stitches or a few dabs of glue to the center part first so that it doesn’t pull away from the rug. Then continue to attach it by stitching neatly all the way around or by using hot glue. Place your punching face down and lay the pant hanger on the back as shown. Affix the sticky hook-and-loop fastener along the bottom edge of the rectangle, and then fold it up over the hanger to check where you want to put the other half.
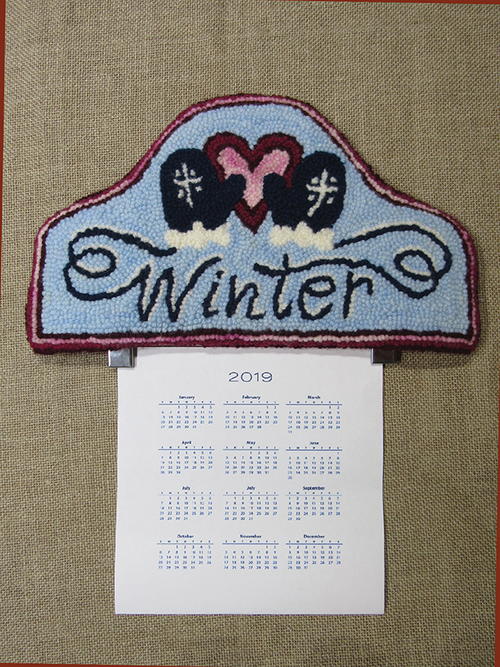
Affix the other half, put the hook-and-loop fastener together over the hanger. Your beautiful calendar is ready to display and enjoy, so make some hot cocoa, get cozy, and admire your punching!
Stay tuned for the next calendar installment when we celebrate SPRING!
Materials List
- Monk's cloth for pattern
- #14 FINE (the Mini) or #13 FINE (the Mini with Heels) Oxford punch needle (or both if you have them)
-
Six colors of yarn. Choose a worsted or Aran weight knitting yarn or finer. Quantities noted are approximate. These are the colors I chose, but please feel free to choose whatever colors you love!
2 oz. sky blue
2 oz. navy blue
1 oz. light variegated pink
1 oz. dark maroon
1⁄2 oz. light maroon
1⁄2 oz. white - 1 standard sheet of plastic canvas to stabilize the project
- 13" x 15" piece of wool fabric in complementary color
- Wooden pant hanger with clips
- 8" of peel-and-stick hook-and-loop fastener
- Glue gun or needle and thread
Punching Best Practices
• Make sure your backing is super-duper tight.
• The slot in the needle should face the direction you are punching; think of it like an arrow pointing the way.
• Punch all the way down until the handle of the needle connects with the backing and won’t go down any more.
• When you bring your needle back up it should just clear the backing, then drag it along the surface. Don’t lift it above the monk’s cloth or you’ll end up with lumps on the back, and loops that are too short on the front.
• Adjust your stitch size to the yarn you are using. Finer yarn equals more stitches per square inch.
• Avoid overpacking your loops and rows as this will cause your rug to curl and can distort your image.
• Avoid punching too loosely. It will look lovely on the back, but you’ll have bare spots on the other side.
• Make sure your yarn is flowing loosely from the ball. Be sure that it isn’t caught under your hand, on your frame, or on the cat! Make yarn puddle’ as you work so that you always have nice loose yarn to work with.
• When you are ready to stop, cut the yarn on the back and poke the tail to the finished side, or cut it on the front to avoid this step.
• Don’t jump over other stitches. I know it is tempting, but please don’t do it. It weakens your rug.
• Be kind to yourself! Punching is very easy but learning anything new takes practice. If your first pieces have a few mistakes, that is okay. Relax, have fun, and enjoy the punch needle experience!
-
Technique
More images:
-
Winter—the first punched calendar header.
-
Working side shows the design in reverse.
-
Trim the excess backing and the plastic canvas.
-
Trace the shape onto the wool.
-
Sew the wool to the hooked piece. Add the pant hanger.
-
Ready to hang on the wall!
About the Author:
Simone Vojvodin is a passionate Oxford punch needle teacher and award-winning artist. Her work has been featured in art galleries, shows, and Celebration of Hand Hooked Rugs. You can purchase patterns, kits, and punch needle supplies from her studio: Red Maple Ruggery. www.redmapleruggery.ca


