
Gallos en Amarillo--Rooster on Yellow Pattern
A Rug Hooking Exclusive Pattern
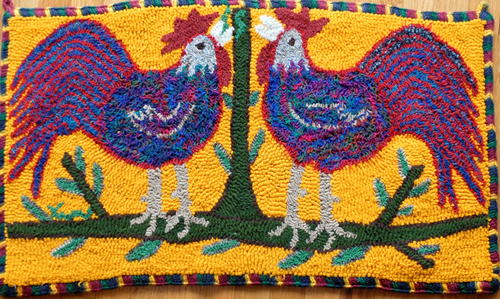
With vibrant blues and reds on a sunny field of yellow, Gallos en Amarillo—Rooster on Yellow, embodies the warmth and humor of Oralia Crisantos, designer, rug hooker, and member of Las Rancheritas, the Rug Hook Project of Agustin Gonzales, Mexico.
Tips for Hooking this Rug
Think in bright, saturated, primary colors to emulate the tone of Oralia's rug. Woolrich red, royal blue, and yellow work well. Mixing in a few strands of lighter or darker red and blue will capture the Las Rancheritas look. They use what they have, blending colors in a variety of ways that we may not consider.
If you have any "mistakes" from the dye pot, try using them in this rug. Using polar fleece or other "found fibers" will also honor the Las Rancheritas' make-do mentality.
Hooking Directions
Pattern preparation
Enlarge the pattern to 15" x 25" using gridded paper or your local photocopy service. Prepare a 22" x 32" fabric backing by sewing or serging the outside edges to prevent fraying. Trace the pattern onto the backing with a permanent fabric marker proven to be colorfast and nonbleeding. Leave a 4" margin around the outside of the pattern.
Light tables are useful in transferring designs to the backing. A sufficiently large window space with backlighting will work if you don't have a light table. Tape the enlarged design to the surface; then tape the prepared backing on top. The backlighting should be strong enough to allow the lines drawn on the pattern to show through both layers. Trace these lines with a permanent fabric marker.
Hooking the Design
Outlining
Outline the outside edges of the design with the background color. Next, outline all elements in the design.
Roosters' bodies
Hook the red details in the tail and the roosters' bodies first. Outline the wing in pale blue. Fill in with a mixture of royal blues, following the curves of the roosters' bodies and tail.
Roosters' heads
Hook the eyes with a #6-cut black strip, pulling the loops a bit higher than the surrounding blue/grey. This added height will allow the eyes to hold their own against the larger #8 cut surrounding loops. Fill in with pale blue/grey. Hook the beak in off-white; then hook the comb and waddle.
Roosters' legs
Hook the legs in pale blue/grey before moving on to the tree branches.
Trees
Study the design and note which leaves (and which roosters' legs) are on top of the branch. Hook them first, then hook the darker green of the branch. Next, hook the leaves. Note the rich yellow-toned green used by Oralia in the branch as compared to the medium blue-toned leaves that glow on the surface of the cheddar cheese yellow background.
Try mixing various dark yellow-greens together for texture and interest; include a strand or two of the leaf blue-green to draw the eye around the rug. Add motion to the rug with directional hooking from the center branch down and outward, both right and left.
Background
Keep the hooking simple for the background, echoing the outlines of the roosters and branch. A solid yellow will reproduce the look of Oralia's rug (Oralia used polar fleece). Mixing a variety of values of a yellow would work nicely too.
Finishing
Before steaming, trim all hooked ends. Shape the eyes, leaves, and ends of the tail feathers by cutting away any background wool desired.
Steaming
Use a double-folded towel to cushion the ironing board. Place the hooked piece face down on the towel. Wet a second towel, wring it out, and place it over the hooked piece in a single layer. Press the iron down without moving it for 15 to 20 seconds, then move to another section and repeat this step. When the back is finished, flip the hooked piece over and repeat the steaming process, rewetting and wringing out the covering towel as needed.
When the top is steamed, find a quiet place to lay your rug to dry. Do not move it for 24 hours.
Binding
Finally, bind or whip the edges in the finishing method you prefer. Oralia crocheted the edge of her rug, incorporating three loops across the top so that she could hang it on the wall. The variegated yarn she used made bands of color in a border effect that complements the colors in the rug. Or you can crochet with #6- or #8-cut strips, tying them in as you go for a more primitive look.
Here's how to proceed: Cut the backing to within 1 1/4" of the finished hooked edge, serge the cut edge, and then roll it toward the front of the rug to simulate cording. Baste or pin the roll in place. Begin crocheting 2" away from any corner. Corners will round themselves as you whip the edges.
This pattern is for personal use only and reselling of the pattern is prohibited.
This article is from the June/July/August 2010 issue. To get this exclusive pattern or for more information on our issue, check out our issues page.
Rug dimensions
14" x 24" hooked; a crocheted finish adds an extra inch or so to the length and width
Wool
Oralia uses hand-cut wool for her rugs, generally equivalent to a #8 cut, narrowing the width of her strips when needed. Gallos en Amarillo is suitable for #6- or #8-cut strips. Many of the Las Rancheritas rug hookers mix polar fleece and other materials with wool when supplies are low and their sense of color demands it.
Read NextEwe Who

