
Tomte, the Elf
Holiday spirit abounds in this Scandinavian elf.
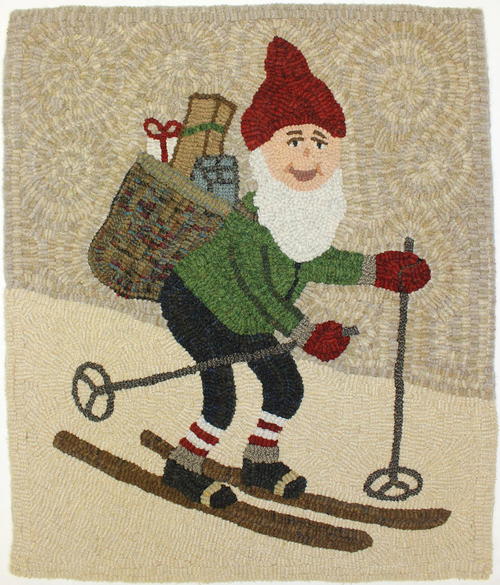
Tomte, the Elf, 19" x 23", #8.5-cut wool on linen. Designed and hooked by Kris Miller/Spruce Ridge Studios, Howell, Michigan, 2013.
A variety of light and textured wools for the background make Tomte come alive as he skis down the snow-covered slopes.
A tomte (Swedish) or a tonttu (Finnish) is a small elf-like man. In Scandinavian folklore, he was the guardian in charge of protecting a farmer’s house and barn and often did his work at night when everyone was asleep. A tomte traditionally has a white beard, wears a red cap, and delivers packages to children on Christmas Eve.
I traced my pattern onto a 27- by 31-inch piece of primitive linen using a permanent black marker. Measure in approximately 4 inches from the edge of the backing and draw a 19- by 23-inch rectangle. Be sure to draw your outside lines on the straight of the grain by placing your pen tip in the “ditch” between two threads and carefully following the threads. You may use a light table to trace the rest of the image, or tape your pattern and backing to a window on a sunny day. To keep the raw backing edges from unraveling, use a serger or wrap the edges with masking tape.
Refer to the wool supply list for wool colors and the necessary cut of the strips used. I hooked my mat mostly in #8.5 cuts, but smaller cuts will work as well.
Hook the Face
I began by hooking the hat with the red texture (A).
I like to work on the face next. That way I am getting the most intricate work done first and the completed face will give immediate character and personality to the rest of the rug. Hook one row of the flesh-toned wool (C) to outline the face. Hand cut a piece of dark brown wool (G), and hook the upper eyelid line for both eyes (you can also use a #4 cut).
Cut a narrow strip of black (K). Start in the middle of the eyelid and hook a vertical line by pulling up an end, hooking a loop, and then pulling up the other end. Using a #4-cut piece of flesh-toned wool and beginning at one end of the upper eyelid, hook a semicircle around the lower half of the eye. As you hook the semicircle, take care to hook right underneath the black center of the eye and end at the opposite end of the upper eyelid.
Now notice that you have two small open areas on both sides of the black center of the eyes. Use a hand-cut or #4-cut strip of the off-white textured wool (D) to fill in these small areas to achieve the “white” of the eyes. Work the eyebrows next by using another #4-cut or hand-trimmed strip of brown (G).
Fill in the rest of the face with the flesh-toned wool (C). As you are filling, hook the nose and the mouth with the appropriate wool colors (E and F). The nose was an end, two loops, and an end. You may have to use different cuts of strips when filling in the face. Once the face is completed, hook the beard with the off-white texture (D).
Color the Elf
Hook the jacket with a cheery Christmas green plaid (H). Define the right arm with an outline of darker green color (I). The basket strap on the shoulder is hooked with the same plaid as the basket (P). Hook the cuffs with a light gray/brown herringbone (M) and the mittens with the red texture (A). Define the thumb and fingers on the left mitten with a small strip of darker red texture (B). I used a #6-cut strip that I found in my scrap pile.
Hook the ski poles with a dark brown herringbone (O), and fill in the pants with the navy plaid wool (J). You can add a whimsical touch to your Tomte by giving him red-and-white striped socks using (A) and (D). The trim on the boots was hooked with the same wool as the jacket cuffs (M). Continue hooking the black boots (K), boot straps (L), and skis (N).
Hook the rim of the basket with a soft gray green plaid (Q). Using a multicolored plaid (P), hook one row as an outline around the basket. To give the basket a woven look, hook straight vertical lines from the basket rim to the bottom of the basket. The packages were hooked with a variety of leftover strips and small pieces of wool. For best results, choose colors that are strong enough to show up against the sky’s neutral background.
Complete the Background
Fill in the snow/ground with a creamy ivory plaid (S). The sky was hooked with a soft khaki plaid (T). The swirls in the sky are the same plaid, hooked to break up the block-like areas and create subtle movement.
Finishing
Steam press your rug on both front and back, and allow it to remain flat for 24 hours to dry completely. Take your mat to your sewing machine, and sew a straight stitch around the entire piece, approximately ¼? from the finished hooked edge. Be careful not to catch the toe of the pressure foot in the outermost row of loops. Use a zigzag stitch to sew on top of the row of straight stitching. Repeat this process ¼" from the first row of stitching.
Thread a worsted weight wool yarn that matches your background color through a bent-tip tapestry needle. Work from the back of your hooking. I fold my linen over a scant 1/4?, hold the twill tape next to the edge, and whip the wool yarn around the folded edge of the linen. I catch a small portion of the twill tape while I am whipping, thus finishing the edge and attaching the twill tape at the same time. Another option is to use two colors of yarn for your whipping: oatmeal or soft khaki for the sky area and creamy ivory for the snow. After I have finished whipping with the yarn, I trim away the backing to within 1? of my hooking and hand sew the other edge of the twill tape to the rug with a slip stitch.
Kris Miller is a self-taught rug hooker who lives on a small farm in Howell, Michigan, and specializes in primitive designs with an emphasis on textured wool and wide cuts. She is the owner of Spruce Ridge Studios, featuring original primitive rug hooking patterns, hand-dyed and as-is wool, and a wide variety of rug hooking supplies. Visit her website at www.spruceridgestudios.com. This pattern is for personal use only, and reselling of the pattern is prohibited.
This article is from the November/December 2013 issue. To get this exclusive pattern or for more information on our issue, check out our issues page.
Note: An ample amount of wool has been estimated for this project. Your needs may vary depending on how high or low you hook.
Read NextHere Comes Santa

